Easy Makeup Steps for a Natural and Glamorous Look
Discover the ultimate guide to easy makeup steps for a natural and glamorous look. Learn the perfect order of makeup application, pro tips.

Table of Contents
Last week, I spent nearly an hour trying to recreate a “five-minute makeup look” I saw online. Frustrated and running late, I wiped it all off and headed out bare-faced, wondering why something that looked so effortless for others felt like rocket science to me. Sound familiar?
Many of us struggle with makeup routines that promise simplicity but deliver complication. The truth is, achieving that perfect balance—makeup that enhances your natural beauty while adding a touch of glamour—doesn’t require professional skills or countless products. What it does require is understanding the right steps in the right order.
Today, I’m sharing a foolproof guide to help you create a polished, natural-yet-glamorous look that works for everyday wear but can easily transition to evening events. No beauty degree required—just simple techniques anyone can master.
What Are Makeup Steps?
Defining the Concept
Easy Makeup Steps refer to the sequential order in which cosmetic products should be applied to create a cohesive, lasting look. Think of it as a recipe—following ingredients in the wrong order might still create something edible, but following the proper sequence ensures the best results.
For beginners especially, understanding these steps eliminates confusion and creates a foundation for consistent results. Each product is designed to work in harmony with others when applied in the correct order, helping products adhere better and last longer throughout the day.
The Evolution of Makeup Routines
Beauty rituals have existed for thousands of years—from ancient Egyptians using kohl to define their eyes to Victorian women pinching their cheeks for a natural flush. Today’s makeup steps combine this rich history with modern innovation.
What’s fascinating is how makeup application has evolved from being purely decorative to incorporating skincare benefits. Modern routines now emphasize prep work and protection alongside color application—something our ancestors didn’t prioritize but that makes a tremendous difference in both appearance and skin health.
Everyday Use and Professional Techniques
There’s often a significant gap between how makeup artists and everyday users approach their routines. Professional makeup artists typically follow a comprehensive series of steps to ensure flawless, camera-ready, long-lasting results. This might include color correction, multiple foundation techniques, and intricate highlighting and contouring.
For everyday wear, however, we can simplify these professional techniques while maintaining their core principles. The key difference lies not in skipping steps entirely but in adapting them to be more efficient and appropriate for daily life. A professional might use four products for perfect brows; you can achieve beautiful results with just one product and the right technique.
Why Makeup Steps Matter in Makeup
The Emotional & Visual Impact
The psychological impact of makeup extends far beyond mere appearance. Studies have shown that wearing makeup can significantly boost confidence levels and affect how others perceive our competence and trustworthiness. When applied with intention and skill, makeup becomes a powerful tool for self-expression and making positive first impressions.
“The way you feel when your makeup looks good can transform your entire day,” explains makeup artist Jamie Ross. “It’s not about masking yourself—it’s about stepping into the world feeling like your best self.”
This emotional benefit is maximized when makeup enhances rather than masks natural features—precisely what a well-executed natural glam look achieves.
Makeup as a Form of Art
While following steps creates structure, makeup application is ultimately an artistic process that should be personalized. The same eight steps will look dramatically different depending on:
- Skin tone and undertones
- Face shape and features
- Personal style preferences
- Occasion and lighting conditions
This customization is where makeup transcends mere routine and becomes creative expression. Learning to adapt techniques for your unique features makes all the difference between makeup that looks “applied” versus makeup that looks like it belongs on your face.
Professional Insights
Makeup artists emphasize that proper application order isn’t just about aesthetics—it’s about longevity and performance. Celebrity makeup artist Lisa Eldridge notes, “The foundation of good makeup is literally the foundation—both skincare and base products. Get those steps right, and everything else falls into place.”
Professionals know that powder products should generally follow cream products, that eye makeup usually precedes face makeup (to catch fallout), and that setting products are crucial for longevity. These principles, when adapted for everyday use, transform your makeup experience from frustrating to fulfilling.
Easy Makeup Steps for a Natural and Glamorous Look
Step 1: Prep Your Skin
The most flawless makeup begins with proper skin preparation. This critical first step determines how well your makeup applies and lasts throughout the day.
Start with a gentle cleanser to remove any oils or residue on your skin. Follow with a moisturizer appropriate for your skin type—lightweight gel formulas work well for oily skin, while richer creams benefit dry skin. Allow the moisturizer to fully absorb for 1-2 minutes.
Next, apply a primer targeted to your main concerns:
- Smoothing primers for textured skin
- Illuminating primers for dullness
- Pore-minimizing primers for visible pores
- Color-correcting primers for redness or discoloration
Pro tip: Apply primer with fingertips, gently pressing instead of rubbing to maximize its grip on the skin.
Step 2: Foundation and Concealer
For a natural yet glamorous look, the goal is even skin tone without a heavy, mask-like appearance. Choose lightweight, buildable foundations like tinted moisturizers, skin tints, or light-to-medium coverage foundations.

Application technique matters more than the product itself:
- Start with a small amount (pea-sized for the entire face)
- Apply from the center of the face outward, where most discoloration occurs
- Blend thoroughly with a damp beauty sponge for the most skin-like finish
- Build up only where needed rather than adding more everywhere
For concealer, use it strategically after foundation:
- Choose a shade that matches your foundation for blemishes
- Select a shade 1-2 shades lighter for under-eyes
- Pat gently with your ring finger or a small brush rather than dragging
- Focus only on areas that need coverage after foundation is applied
Step 3: Define Your Brows
Well-groomed brows frame your face and can look polished even without much other makeup. For natural-looking brows:
- Brush brows upward with a spoolie to see their natural shape
- Fill in only the sparse areas using light, feathery strokes that mimic hair
- Focus on the arch and tail, which tend to be thinner
- Set with clear brow gel for all-day hold without stiffness
Product selection tip: Pencils provide the most natural finish for beginners. Brow powders work well for those with already full brows needing minimal filling. Pomades and gels are best saved for more defined, editorial looks.
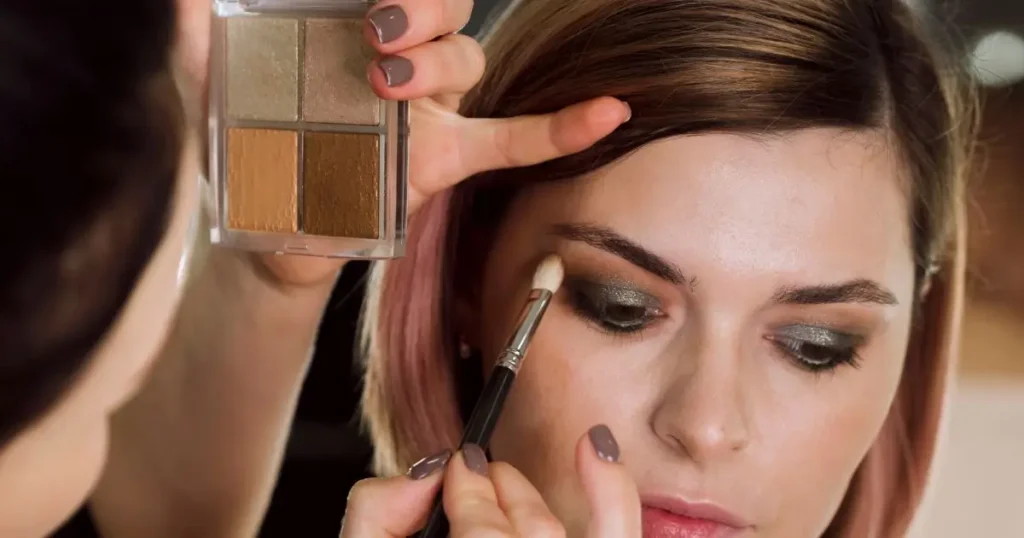
Step 4: Eye Makeup Basics
Simple eye makeup can make a surprising difference in how awake and put-together you appear. For an everyday eye that still has impact:
- Apply a neutral base shadow (beige, soft peach, or light brown) across the entire lid
- Define the crease with a slightly deeper neutral shade (taupe, soft brown, or mauve)
- Add a touch of shimmer or light matte shade to the center of the lid and inner corner
- Apply a thin line of brown or black eyeliner along the upper lash line, staying as close to the lashes as possible
- Curl lashes and apply 1-2 coats of lengthening mascara
Time-saving tip: Choose a satin-finish shadow that falls between matte and shimmer for a one-and-done eye look. Apply it all over the lid and blend up toward the brow bone.
Step 5: Add Color with Blush
Blush brings life back to the face after foundation has evened out your natural color variations. For the most flattering application:
- Smile to locate the apples of your cheeks
- Apply color to the apples and blend upward toward the temples
- Use a light hand—you can always build up intensity
Color selection guide:
- Fair skin: Soft pinks and peaches
- Medium skin: Rose, mauve, and warm peach tones
- Deep skin: Rich berries, warm tangerines, and brick reds
Formula tip: Cream blushes create the most natural “glow from within” effect for a natural glam look. Apply with fingertips before any
powder products for seamless blending.

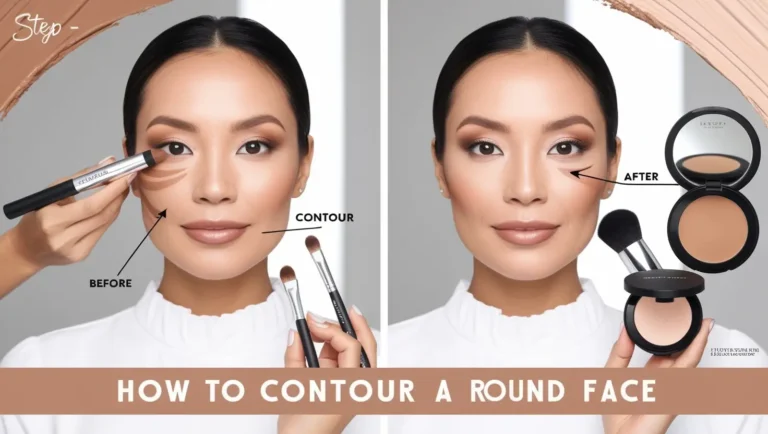
Step 6: Highlight & Subtle Contour
Strategic highlighting adds dimension without looking overdone. For natural glamour:
- Apply highlighter only where light naturally hits: tops of cheekbones, center of brow bone, and perhaps a touch on the cupid’s bow
- Choose formulas with finely-milled shimmer rather than chunky glitter
- For daytime, consider luminous powder or cream formulas over metallic ones
If contouring, keep it minimal:
- Use a product only 1-2 shades deeper than your skin tone
- Focus on the hollow beneath cheekbones and perhaps the jawline
- Blend extensively so no harsh lines remain
Step 7: Lip Color Magic
The perfect lip completes your natural glam look. Choose from:
- Tinted lip balm: The most effortless option for hydration with a hint of color
- Nude lipstick: Select shades that enhance your natural lip color rather than washing it out
- Pink gloss: Adds youthful dimension and pairs beautifully with more minimal eye makeup
Application technique for natural-looking lips:
- Exfoliate lips gently if needed
- Apply a thin layer of lip balm and blot
- For lipstick, apply from the center outward, blotting for a lived-in look
- For gloss, apply primarily to the center of the lips for dimension without stickiness
Step 8: Setting the Look
The final step ensures your makeup lasts throughout the day or evening. Choose between:
- Setting spray: Ideal for normal to dry skin and a more luminous finish
- Setting powder: Better for oily skin or when longevity is the priority
Application tips:
- For setting spray, hold the bottle 8-10 inches from your face and spray in an X and T formation
- For powder, press (don’t swipe) a small amount on the T-zone and under eyes
- Consider using both: powder in strategic areas, followed by setting spray overall
Common Makeup Mistakes to Avoid
Skipping Skin Prep
One of the biggest mistakes is rushing straight to color products without proper skin preparation. Without moisturizer and primer, makeup clings to dry patches, separates on oily areas, and generally looks less skin-like. Taking just two extra minutes for proper prep can extend your makeup’s wear time by hours.
Using Too Much Product
More isn’t better when it comes to achieving a natural yet glamorous look. Excess product:
- Settles into fine lines and emphasizes texture
- Creates a heavy, mask-like appearance
- Takes longer to apply and blend
- Is more likely to transfer and fade unevenly
The solution: Start with less than you think you need. It’s always easier to add more than to remove excess.
Ignoring Natural Lighting
Applying makeup in poor lighting leads to mismatched foundation, heavy-handed blush, and unblended edges. Always try to:
- Use natural daylight when possible
- Invest in a lighted mirror that simulates daylight
- Check your makeup in different lighting before leaving home
Wrong Order of Makeup Application
Applying products in the incorrect order can cause them to pill, separate, or fade quickly. Common ordering mistakes include:
- Applying powder products before cream products (which prevents proper blending)
- Using setting spray before mascara (which can cause smudging)
- Applying blush before contour (which can move your placement)
How to Fix These Mistakes Easily
Made a makeup misstep? Here’s how to recover without starting over:
- Heavy foundation: Press a damp beauty sponge over areas with excess product
- Overdone powder: Spritz setting spray to melt products together
- Too much blush: Tap over it lightly with the foundation sponge you used earlier
- Eyeshadow fallout: Use a small concealer brush to clean up without disturbing foundation
- Smudged mascara: Let it dry completely, then flake it off with a spoolie brush
Pro Tips & Makeup Artist Secrets
Must-Have Tools for Easy Makeup Steps
The right tools make a significant difference in application ease and final appearance:
- Quality foundation brush or beauty sponge: Creates seamless blending impossible with fingers alone
- Fluffy blending brush: Essential for diffused, professional-looking eyeshadow
- Spoolie brush: Grooms brows and separates lashes
- Small concealer brush: Provides precision for spot concealing
- Multi-tasking face brush: Works for blush, bronzer, and powder
Investment tip: If you’re on a budget, prioritize base tools (sponge/foundation brush) and an eyeshadow blending brush first. These make the biggest difference in overall appearance.
Time-Saving Hacks for Quick Mornings
When time is tight, these professional shortcuts maintain quality while cutting minutes:
- Use multi-use products like cheek/lip tints
- Apply foundation only where needed rather than all over
- Choose stick products that apply directly and blend with fingers
- Set a 5-product limit for super-rushed days
- Keep a “quick face” set separate from your full collection
“My favorite hack for busy clients is cream shadow sticks,” shares makeup artist Sam Visser. “One swipe across the lid and blended with a finger creates dimension with minimal effort.”
Little Touches That Make a Big Difference
Small details often separate amateur makeup from polished looks:
- Curling eyelashes before mascara (10 seconds that transform the eye)
- Adding highlight to the inner corners of eyes (instantly brightens)
- Brushing through mascara to separate clumps (for natural-looking lashes)
- Blotting lipstick then adding a tiny bit of gloss to the center (for dimensional lips)
- Tapping highlight on the cupid’s bow (subtly enhances lip shape)
Recommended Products for Natural Glam
These products consistently perform well for achieving the natural glamorous look:
Base Products:
- MAC Face & Body Foundation: Sheer but buildable with a natural finish
- NARS Radiant Creamy Concealer: Versatile for both under-eyes and blemishes
Eyes & Brows:
- Anastasia Beverly Hills Brow Wiz: Creates hair-like strokes for natural brows
- Charlotte Tilbury Eyes to Mesmerize: Cream shadows that blend easily
- Clinique High Impact Mascara: Defines without clumping
Cheeks & Lips:
- Glossier Cloud Paint: Foolproof cream blush that blends seamlessly
- Rare Beauty Soft Pinch Liquid Blush: Incredibly pigmented (use sparingly)
- Fenty Beauty Gloss Bomb: Universally flattering pink gloss finish
Quick Toolkit for Natural & Glam Makeup
| Tool/Product | Purpose | Pro Tip |
|---|---|---|
| Moisturizer & Primer | Skin prep for smooth makeup | Wait 1 minute after priming |
| Lightweight Foundation | Natural-looking base | Apply with damp beauty sponge |
| Brow Pencil | Define brows naturally | Use light, feathery strokes |
| Neutral Eyeshadow Palette | Soft, everyday eye looks | Stick to 2-3 shades max |
| Setting Spray | Lock makeup in place | Mist lightly after full face |
Conclusion
Mastering these simple makeup steps can transform not just your appearance but your entire relationship with makeup. When you understand the proper order of makeup application and focus on enhancing rather than masking your features, daily makeup becomes less about covering “flaws” and more about expressing your natural beauty with confidence.
Remember that perfect makeup isn’t about complexity—it’s about intentionality. Even the most basic routine, when executed with the right techniques and in the proper sequence, can create that coveted natural yet glamorous look that works everywhere from office meetings to dinner dates.
The best part? Once you’ve practiced these steps a few times, this entire routine can take as little as 10 minutes. Your future self will thank you for taking the time to learn these fundamentals rather than continuing to struggle with overly complicated tutorials.
Which step do you find the most important in your routine? Let us know in the comments!
FAQs About Easy Makeup Steps
What is the correct order of makeup application for a natural look?
Always start with skincare, then foundation/concealer, brows, eyes, cheeks, lips, and setting products. This sequence ensures each product works optimally—primer creates grip for foundation, setting powder locks in cream products, and setting spray melds everything together. For the most natural finish, the order might slightly vary (doing eyes before foundation to prevent fallout cleanup), but the core progression remains consistent.
How can we do makeup quickly every day?
Focus on multipurpose products and skip heavy layers—natural makeup should feel breathable. Create a dedicated “rush routine” with cream products that blend quickly with fingers: a tinted moisturizer with SPF, cream blush that doubles as lip color, a neutral cream shadow, and mascara. Practice this specific routine until you can complete it in under five minutes, and keep these products together for grab-and-go convenience.
How to apply cosmetics without looking cakey?
Use lightweight, buildable formulas and blend thoroughly under natural light. The key is layering thin coats of product rather than applying one thick layer. Always allow each cream or liquid product to set for a few seconds before applying the next one. For areas needing extra coverage, use a precise concealer application rather than adding more foundation everywhere. Finally, press powder in with a puff rather than sweeping it on with a brush.
When can you put makeup on after skincare?
Let moisturizer and primer absorb for about 2 minutes before starting makeup. This waiting period allows skincare ingredients to properly set, preventing them from mixing with makeup and causing pilling or separation. You’ll know your moisturizer is ready when it no longer feels tacky to the touch. If you’re in a hurry, gently press a clean tissue over your face to remove excess product before beginning your foundation application.
Can beginners master these easy makeup steps?
Absolutely! With simple practice, anyone can create a polished natural and glamorous look. Focus on mastering one step at a time rather than perfecting the entire routine at once. Start with foundation and concealer, and once you’re comfortable, add the next step. Remember that makeup is temporary—practice when you have time to experiment and remove it if needed. Consider taking progress photos to see your improvement over time.

Hi, I’m Ella Blush! I share easy makeup tips, real reviews, and everyday glam looks to help you feel confident, beautiful.